
| 일 | 월 | 화 | 수 | 목 | 금 | 토 |
|---|---|---|---|---|---|---|
| 1 | 2 | 3 | 4 | 5 | ||
| 6 | 7 | 8 | 9 | 10 | 11 | 12 |
| 13 | 14 | 15 | 16 | 17 | 18 | 19 |
| 20 | 21 | 22 | 23 | 24 | 25 | 26 |
| 27 | 28 | 29 | 30 |
- delete
- 프로그래머스 코테
- foreigen key
- 멱등성
- 메세지 큐
- Shared Lock
- 지연로딩
- null/not null
- N+1
- 변수와 상수
- exclusive lock
- jsoup
- 피연산자
- 원시타입
- 오버라이딩
- SQL
- git 기초
- 서버 스크립트
- 참조타입
- InterruptedException
- 즉시로딩
- 컬렉션 프레임워크
- select
- 프로그래머스
- Java
- 연산자와의 관계
- 오버로딩
- bufferedInputStream
- 추상메서드
- 변수와 메서드
- Today
- Total
[JAVA_Back-End]
[DATABASE] 인덱스 / 사용자 생성 + 권한 부여 본문
< 지난 포스팅 정리 >
[DATABASE] ALTER - 테이블 속성 설정 (+ 제약조건, view)
< 이전 포스팅 정리 > [DATBASE] DML(SELECT 서브쿼리) + DDL(CREATE/ALTER/DROP) < 지난 포스팅 정리 > [DATABASE] DML - SELECT < 지난시간 정리 > 데이터베이스 => 데이터베이스 관리 시스템 (DBMS) - 대량/분산의 데이
thstnqls.tistory.com
데이터베이스 <- 개발자
* 데이터베이스 모델링(기획)
초기개발
리모델링
=> ERD
엔터티 / 속성
버전별로 관리할 필요가 있음
기획과정 (벤치마킹)
* 데이터 확인
select*from emp; (x) -> 냅다 전체데이터 출력하지 말기
해당 순서로 테이블 데이터를 확인하기
1. desc 테이블명;
2. select count(*) from 테이블명; //데이터의 개수 확인하기
3. select*from emp limit 0,3;
* select
=> 전수확인 (돈 관련 데이터...)
* 백업 (작업 전) / 리스토어 철저
1. 프로그램 소스
2. 자료
1. 테이블 생성
constraint
pk fk / not null
2. 뷰 생성
시스템
information_schema=> view

인덱스 - 목차
정렬된 목차
오름차순
내림차순
B-tree(이진 트리)
테이블 스캔 - 데이터가 입력된 순서
고속
인덱스 스캔
pk, unique 중심으로 중복성이 없을 때 인덱스를 잘 만들 수 있음
모든 데이터가 균등하게 나오기를 원함
알고리즘 - 옵티마이저 :SQL을 어떻게 실행할 것인지 실행 계획을 수립
옵티마이저가 제대로 된 인덱스를 갈 수 있도록 DBA가 튜닝을 통해 조절해준다.
인덱스
생성된 인덱스 확인
> show index from 테이블명;
1. 자동생성
- primary key (pk생성 시 인덱스 또한 자동생성 된다. 삭제 또한 마찬가지)
> alter table dept_i add constraint primary key(deptno); //인덱스 자동생성
> alter table dept_i drop primary key; //자동생성된 인덱스 삭제

- unique
> alter table dept_i add constraint unique(deptno); //인덱스 자동생성


2. 수동생성
사용자, 권한 => 보안
사용자
root - 신(유닉스..)
암호
- 사용자: 데이터베이스 사용 권한
아이디 + 접근 위치 => 이메일
사용자
사용자를 만들기
데이터베이스()
테이블
컬럼
GRANT 기본문법
객체권한 부여
- 객체권한명: 객체에 사용 가능한 권한
- 컬럼명: 만약 ON 절의 Object가 Table이나 View일 경우
- ON 객체명: Table, VIew, Sequence, Procedure 등
- TO {유저명 | 롤명 | PUBLIC} : 사용자를 일일이 나열 할 수 있고, ROLE 에 소속된 사용자가 될수도 있다.
- WITH GRANT OPTION: 이 옵션을 사용하면 TO 절의 대상도 자신이 받은 권한을 다른 유저에게 부여할수 있다.
> GRANT[객체권한명](컬럼)
ON[객체명]
TO{유저명 | 롤명 | PUBLIC} [ WITH GRANT OPTION]
REVOKE 기본문법
객체 권한의 회수
- 객체 권한의 철회는 그 권한을 부여한 주체만이 수행할 수 있다.
> REVOKE {권한명 [, 권한명...] ALL}
ON 객체명
FROM {유저명 [, 유저명...] | 롤명(ROLE) | PUBLIC}
[CASCADE CONSTRAINTS]
* 사용자 확인
> select user;

* 사용자 생성
> create user tester1@localhost identified by '123456';
* 생성된 사용자 확인
> select host, user, password, select_priv from mysql.user;

* 권한 부여
> create user tester1@'%' identified by '123456'; //123456은 비밀번호임
=> 부여된 권한으로 생성된 사용자가 데이터베이스에 접속할 수 있다.
=> %는 localhost뿐 아니라 다양한 곳에서 접근 가능하도록 한다 (ex..IP)
*생성된 사용자가 어떻게 생성되었는지 확인할 수 있음
> show create user tester1@'%';

* 생성한 사용자 삭제
> drop user tester1@'%';
권한(DCL- grant / revoke)
권한의 종류
- 시스템 권한 : 시스템에 관한 권한
- 객체 권한 : 데이터베이스, 테이블, 뷰, 컬럼 등
* 권한 확인
> show grants for root@localhost;
> show grants for tester1@localhost;

* 생성한 사용자에게 DB접근 권한 부여 (root쪽)
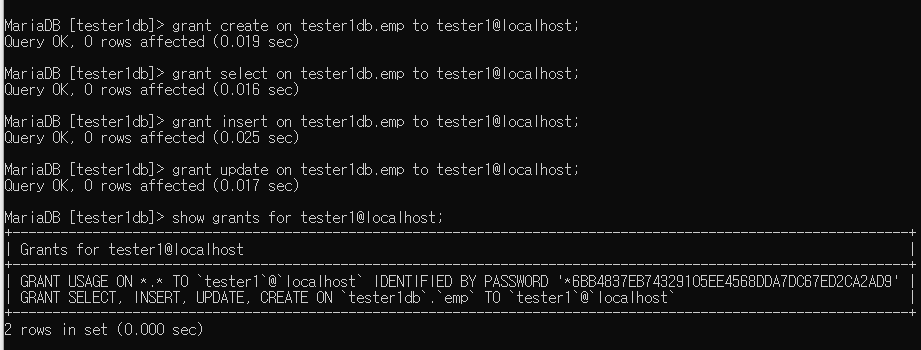
> grant create on tester1db.* to tester1@localhost; //tester1db에 대한 전체테이블 create권한 부여
> grant create on tester1db.테이블 이름 to tester1@localhost; //tester1db에 대한 특정 테이블 create권한부여
> show grants for tester1@localhost; //tester1(생성사용자)의 권한 확인


*사용자에게 모든 권한을 부여
> grant all privileges on tester1db.* to tester1@localhost; //tester1db에 대한 전체 테이블에 대한 전체권한부여
> grant all privileges on *.* to tester1@localhost; //전체 데이터베이스에 대한 전체 테이블에 대한 전체 권한 부여


revoke ~from~
revoke create on tester1db.* from tester1@localhost;
root ->사용자 ->데이터베이스
데이터베이스
사용자 사용자+권한
권한
데이터베이스를 생성하고 사용자를 만든 후 권한부여까지 하는 순서
(root에서)
1. 사용자가 접근 가능하게 하는 데이터베이스 생성
> create database 데이터베이스명;
2. 해당 데이터베이스를 바탕으로 사용자 이름을 지정하고 권한을 부여
> grant all privileges on tester2db.*to tester2@localhost identified by '123456'; //사용자생성과 권한부여를 동시에..
>create user tester1@'%' identified by '123456'; //만약 권한부여가 %라면 어디서든 접근 가능한 사용자인 것이다.

3. 사용자 목록을 확인
> select host, user from mysql.user;
4. 만들어진 데이터베이스 목록을 확인
> show databases;

(사용자 계정에서)
5. 권한 부여된 데이터베이스 확인
> show databases;
6. create로 테이블 생성해보기 (권한이 제대로 부여가 되었는지)
> create table testtbl(
-> col1 varchar2(10));
7. 만약 CRUD권한을 모두 부여했다면 해당 기능 명령어들 다 쳐보기(select, update, delete, drop, view...)
8. 이상 없다면 권한 부여 완료된것임.
원본데이터 경로
C:\Program Files\MariaDB 11.1\data
프로그램으로 백업
dump
CSV
=> 복원 전체
mariadb설치경로로 가서 mariadb바깥에서 mysqldump를 사용


c:\mariadb > mysqldump -u root -p sample emp > emp.sql //하나의 테이블만 백업하고 싶을 때
>mysql -u root -p tester1db < all.sql //백업한 내용을 다시 리스토어 할 때


JAVA 데이터 저장
임시 저장
- collection
영구 저장
로컬
- 파일
원격
- 데이터베이스
서버 - IP, 포트, 아이디, 패스워드
- 원격파일
java - 데이터베이스 연결
=> jdbc
자바는 DBMS의 종류에 상관없이 하나의 JDBC API를 사용해서 데이터베이스 작업을 처리할 수 있다.
https://mariadb.com/downloads/
1.jar파일을 다운로드
2. JDBC 드라이버 로딩
3. 쿼리 실행을 위한 Statement 객체 생성
4. 쿼리 실행
5. 쿼리 실행 결과 사용
6. Statement 종료
7. 데이터베이스 커넥션 종료

mariadb -> org.mariadb.jdbc.Driver
jdbcDriver -> jdbc:mariadb://localhost:3306/sample

| JDBCEx01.java |
|
public class JDBCEx01 {
public static void main(String[] args) { // TODO Auto-generated method stub System.out.println("시작"); try { Class.forName("org.mariadb.jdbc.Driver"); System.out.println("드라이버 로딩 성공"); }catch(ClassNotFoundException e) { System.out.println("드라이버 로딩 실패"); System.out.println("에러"+e.getMessage()); } System.out.println("끝"); } } |
| JDBCEx02.java |
|
import java.sql.Connection;
import java.sql.DriverManager; import java.sql.SQLException; public class JDBCEx02 { public static void main(String[] args) { // TODO Auto-generated method stub System.out.println("시작"); try { Class.forName("org.mariadb.jdbc.Driver"); System.out.println("드라이버 로딩 성공"); }catch(ClassNotFoundException e) { System.out.println("드라이버 로딩 실패"); System.out.println("에러"+e.getMessage()); } //데이터베이스에 연결 String url="jdbc:mariadb://localhost:3306/sample"; String user="root"; String password="!123456"; Connection conn = null; try { conn = DriverManager.getConnection(url,user,password); System.out.println("연결 성공"); } catch (SQLException e) { System.out.println("에러"+e.getMessage()); }finally { if(conn!=null)try {conn.close();}catch(SQLException e) {}; } System.out.println("끝"); } } |
| JDBCEx03.java |
|
import java.sql.Connection;
import java.sql.DriverManager; import java.sql.SQLException; public class JDBCEx03 { public static void main(String[] args) { // TODO Auto-generated method stub //데이터베이스에 연결 String url="jdbc:mariadb://localhost:3306/sample"; String user="root"; String password="!123456"; Connection conn = null; try { Class.forName("org.mariadb.jdbc.Driver"); System.out.println("드라이버 로딩 성공"); conn = DriverManager.getConnection(url,user,password); System.out.println("연결 성공"); } catch (ClassNotFoundException e) { System.out.println("에러"+e.getMessage()); } catch (SQLException e) { System.out.println("에러"+e.getMessage()); }finally { if(conn!=null)try {conn.close();}catch(SQLException e) {}; } } } |
| JDBCEx04.java |
|
import java.sql.Connection;
import java.sql.DriverManager; import java.sql.SQLException; import java.sql.Statement; public class JDBCEx04 { public static void main(String[] args) { // TODO Auto-generated method stub //데이터베이스에 연결 String url="jdbc:mariadb://localhost:3306/sample"; String user="root"; String password="!123456"; Connection conn = null; Statement stmt = null; try { Class.forName("org.mariadb.jdbc.Driver"); System.out.println("드라이버 로딩 성공"); conn = DriverManager.getConnection(url,user,password); System.out.println("연결 성공"); stmt = conn.createStatement(); String sql ="insert into dept2 values(50,'개발부','서울')"; int result=stmt.executeUpdate(sql); System.out.println("실행결과: "+result); } catch (ClassNotFoundException e) { System.out.println("에러"+e.getMessage()); } catch (SQLException e) { System.out.println("에러"+e.getMessage()); }finally { if(stmt!=null)try {stmt.close();}catch(SQLException e) {}; if(conn!=null)try {conn.close();}catch(SQLException e) {}; } } } //DB와 연결을 확인할 때는 공백과 오타를 항상 확인하도록 하자! |

sql문을 삽입할 수 있는 여러방법
| JDBCEx04.java |
|
import java.sql.Connection;
import java.sql.DriverManager; import java.sql.SQLException; import java.sql.Statement; public class JDBCEx04 { public static void main(String[] args) { // TODO Auto-generated method stub //데이터베이스에 연결 String url="jdbc:mariadb://localhost:3306/sample"; String user="root"; String password="!123456"; Connection conn = null; Statement stmt = null; try { Class.forName("org.mariadb.jdbc.Driver"); System.out.println("드라이버 로딩 성공"); conn = DriverManager.getConnection(url,user,password); System.out.println("연결 성공"); stmt = conn.createStatement(); String deptno="70"; String dname ="연구부"; String loc ="서울"; //String sql ="insert into dept2 values(50,'개발부','서울')"; //String sql2 ="insert into dept2 values("+deptno+",'"+dname+"'"+",'"+loc+"')"; String sql3 = String.format("insert into dept2 values(%s,'%s','%s')", 80,dname,loc); int result=stmt.executeUpdate(sql3); System.out.println("실행결과: "+result); } catch (ClassNotFoundException e) { System.out.println("에러"+e.getMessage()); } catch (SQLException e) { System.out.println("에러"+e.getMessage()); }finally { if(stmt!=null)try {stmt.close();}catch(SQLException e) {}; if(conn!=null)try {conn.close();}catch(SQLException e) {}; } } } |

dept.txt => dept2 table
| JDBCEx07.java - 이클립스로 테이블 생성 후 csv로 데이터 읽어와 테이블에 저장 |
|
import java.io.BufferedReader;
import java.io.FileNotFoundException; import java.io.FileReader; import java.io.IOException; import java.sql.Connection; import java.sql.DriverManager; import java.sql.SQLException; import java.sql.Statement; public class JDBCEx07 { public static void main(String[] args) { // TODO Auto-generated method stub //데이터베이스에 연결 String url="jdbc:mariadb://localhost:3306/sample"; String user="root"; String password="!123456"; Connection conn = null; Statement stmt = null; BufferedReader br=null; try { Class.forName("org.mariadb.jdbc.Driver"); //로딩 System.out.println("드라이버 로딩 성공"); conn = DriverManager.getConnection(url,user,password); //연결 System.out.println("연결 성공"); stmt = conn.createStatement(); String sql = "create table dept2(deptno int(2), dname varchar(14), loc varchar(13))"; //테이블 생성 int result = stmt.executeUpdate(sql); System.out.println("실행결과: "+result); String data=null; br=new BufferedReader(new FileReader("./dept.csv")); //csv파일을 버퍼로 읽어들임 while((data=br.readLine())!=null) { String[]deptline=data.split(","); //구분자는 ,로 설정 String sql2 = String.format("insert into dept2 values(%s,'%s','%s')", deptline[0],deptline[1],deptline[2]); //deptline을 버퍼로 저장받아 해당 결과를 한줄씩 insert한다. int result2 = stmt.executeUpdate(sql2); System.out.println("실행결과: "+result2); } } catch (ClassNotFoundException e) { System.out.println("에러"+e.getMessage()); } catch (SQLException e) { } catch (FileNotFoundException e) { System.out.println("에러"+e.getMessage()); } catch (IOException e) { System.out.println("에러"+e.getMessage()); }finally { if(stmt!=null)try {stmt.close();}catch(SQLException e) {}; if(conn!=null)try {conn.close();}catch(SQLException e) {}; if(br!=null)try {br.close();}catch(IOException e) {}; } } } |

테이블에 부분권한 주기 -> revoke하고 grant하는거 연습

'SQL' 카테고리의 다른 글
| [MySQL] SELECT 데이터 추출하기 (0) | 2024.03.20 |
|---|---|
| [DATABASE] 정리 (0) | 2023.09.22 |
| [DATABASE] ALTER - 테이블 속성 설정 (+ 제약조건, view) (1) | 2023.09.07 |
| [DATBASE] DML(SELECT 서브쿼리) + DDL(CREATE/ALTER/DROP) (0) | 2023.09.06 |
| [DATABASE] DML - SELECT (0) | 2023.09.05 |


